ActiveX objects and .NET components are commonly seen in visualization solutions, but since the interfaces are migrating to a more platform-agnostic concept, the usage of these components can't be applied to solutions where a web interface is required, as they aren't supported by modern browsers. In order to fill this gap and provide a single user-experience in both local visualization and web interface, AVEVA has introduced the HTML 5 Widget in inTouch HMI and Custom Widgets in AVEVA Edge. Even though the feature has different names on each product, the feature is the same on both products, and the interchangeability of widgets between products is also possible. In other words, both products can share the same widgets between them.
In this article I'd like to describe how to create Web Widgets in AVEVA Edge and later use it in InTouch HMI.
01. Creating a Custom Widget in AVEVA Edge
In the current version of InTouch HMI 2020, it's still not possible to create an HTML 5 Widget, therefore we'll use AVEVA Edge to create the widget and later import it to InTouch HMI.
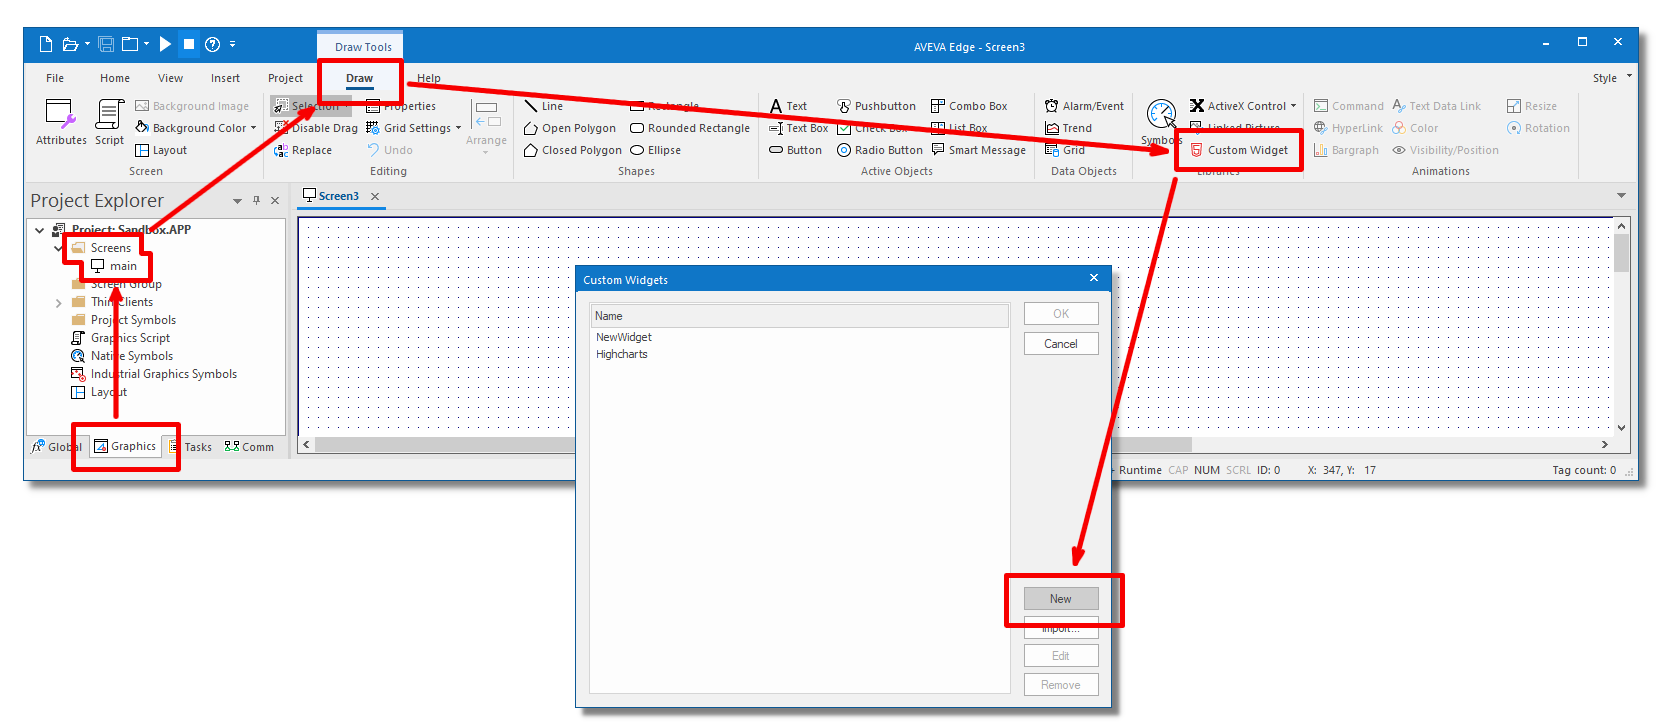
In the AVEVA Edge's IDE, please open a screen or create a new one, go to the Draw tab and press Custom Widgets. In the next dialog, please press New.
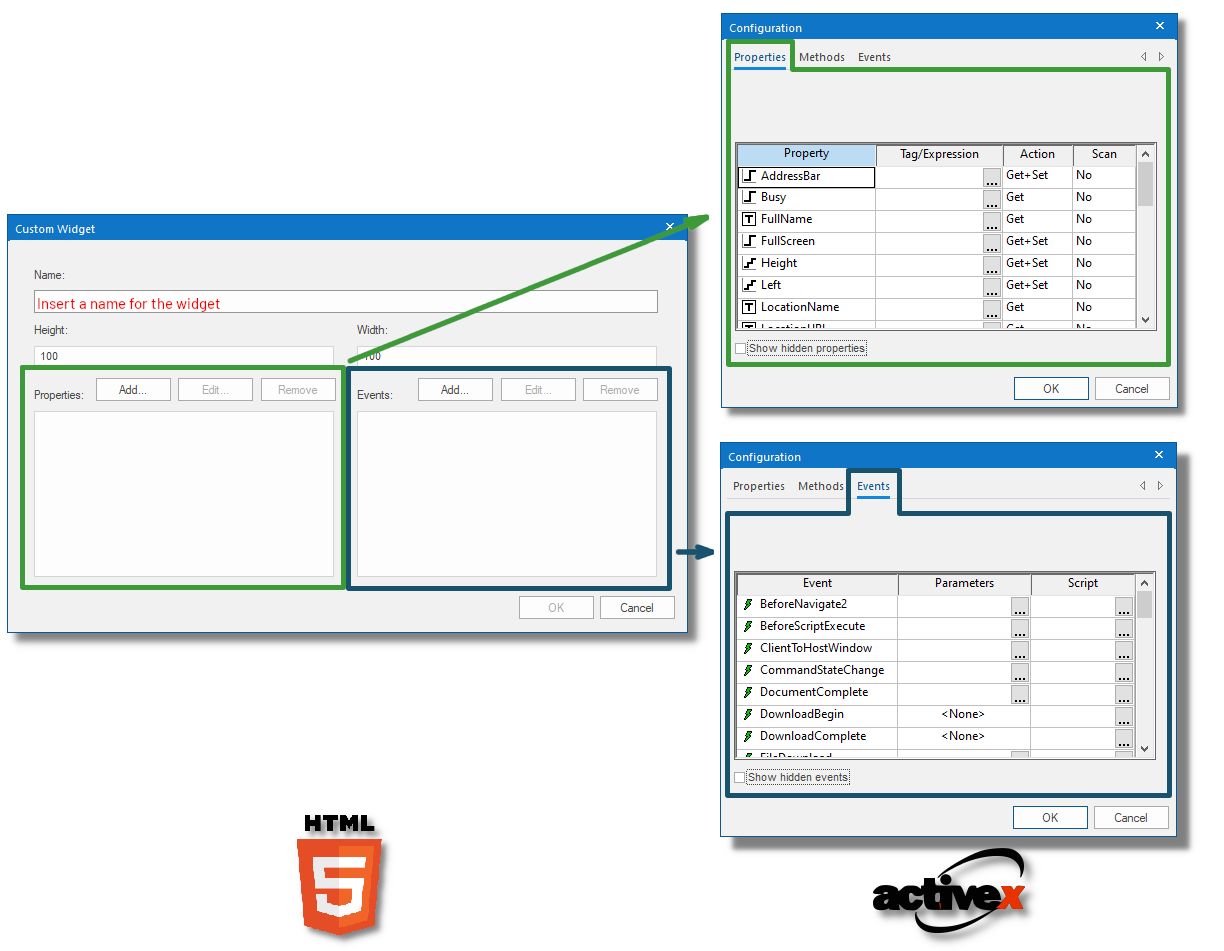
Just like an ActiveX, HTML Widgets are composed by Properties, which can be assigned to tags, and Events, which are actions performed by the users. Even though Methods are not shown in this dialog, it's possible to create them in the JavaScript code of the widget. Enter a name for your widget, a width and height and the required Properties and Events. At the end press OK and the widgets is created.
The widget is created under the Web\Widgets folder inside the project folder. To help you to navigate to the project folder, you can right-click over Project: <Project Name> inside the Project Explorer tab as shown in the picture 03 below.
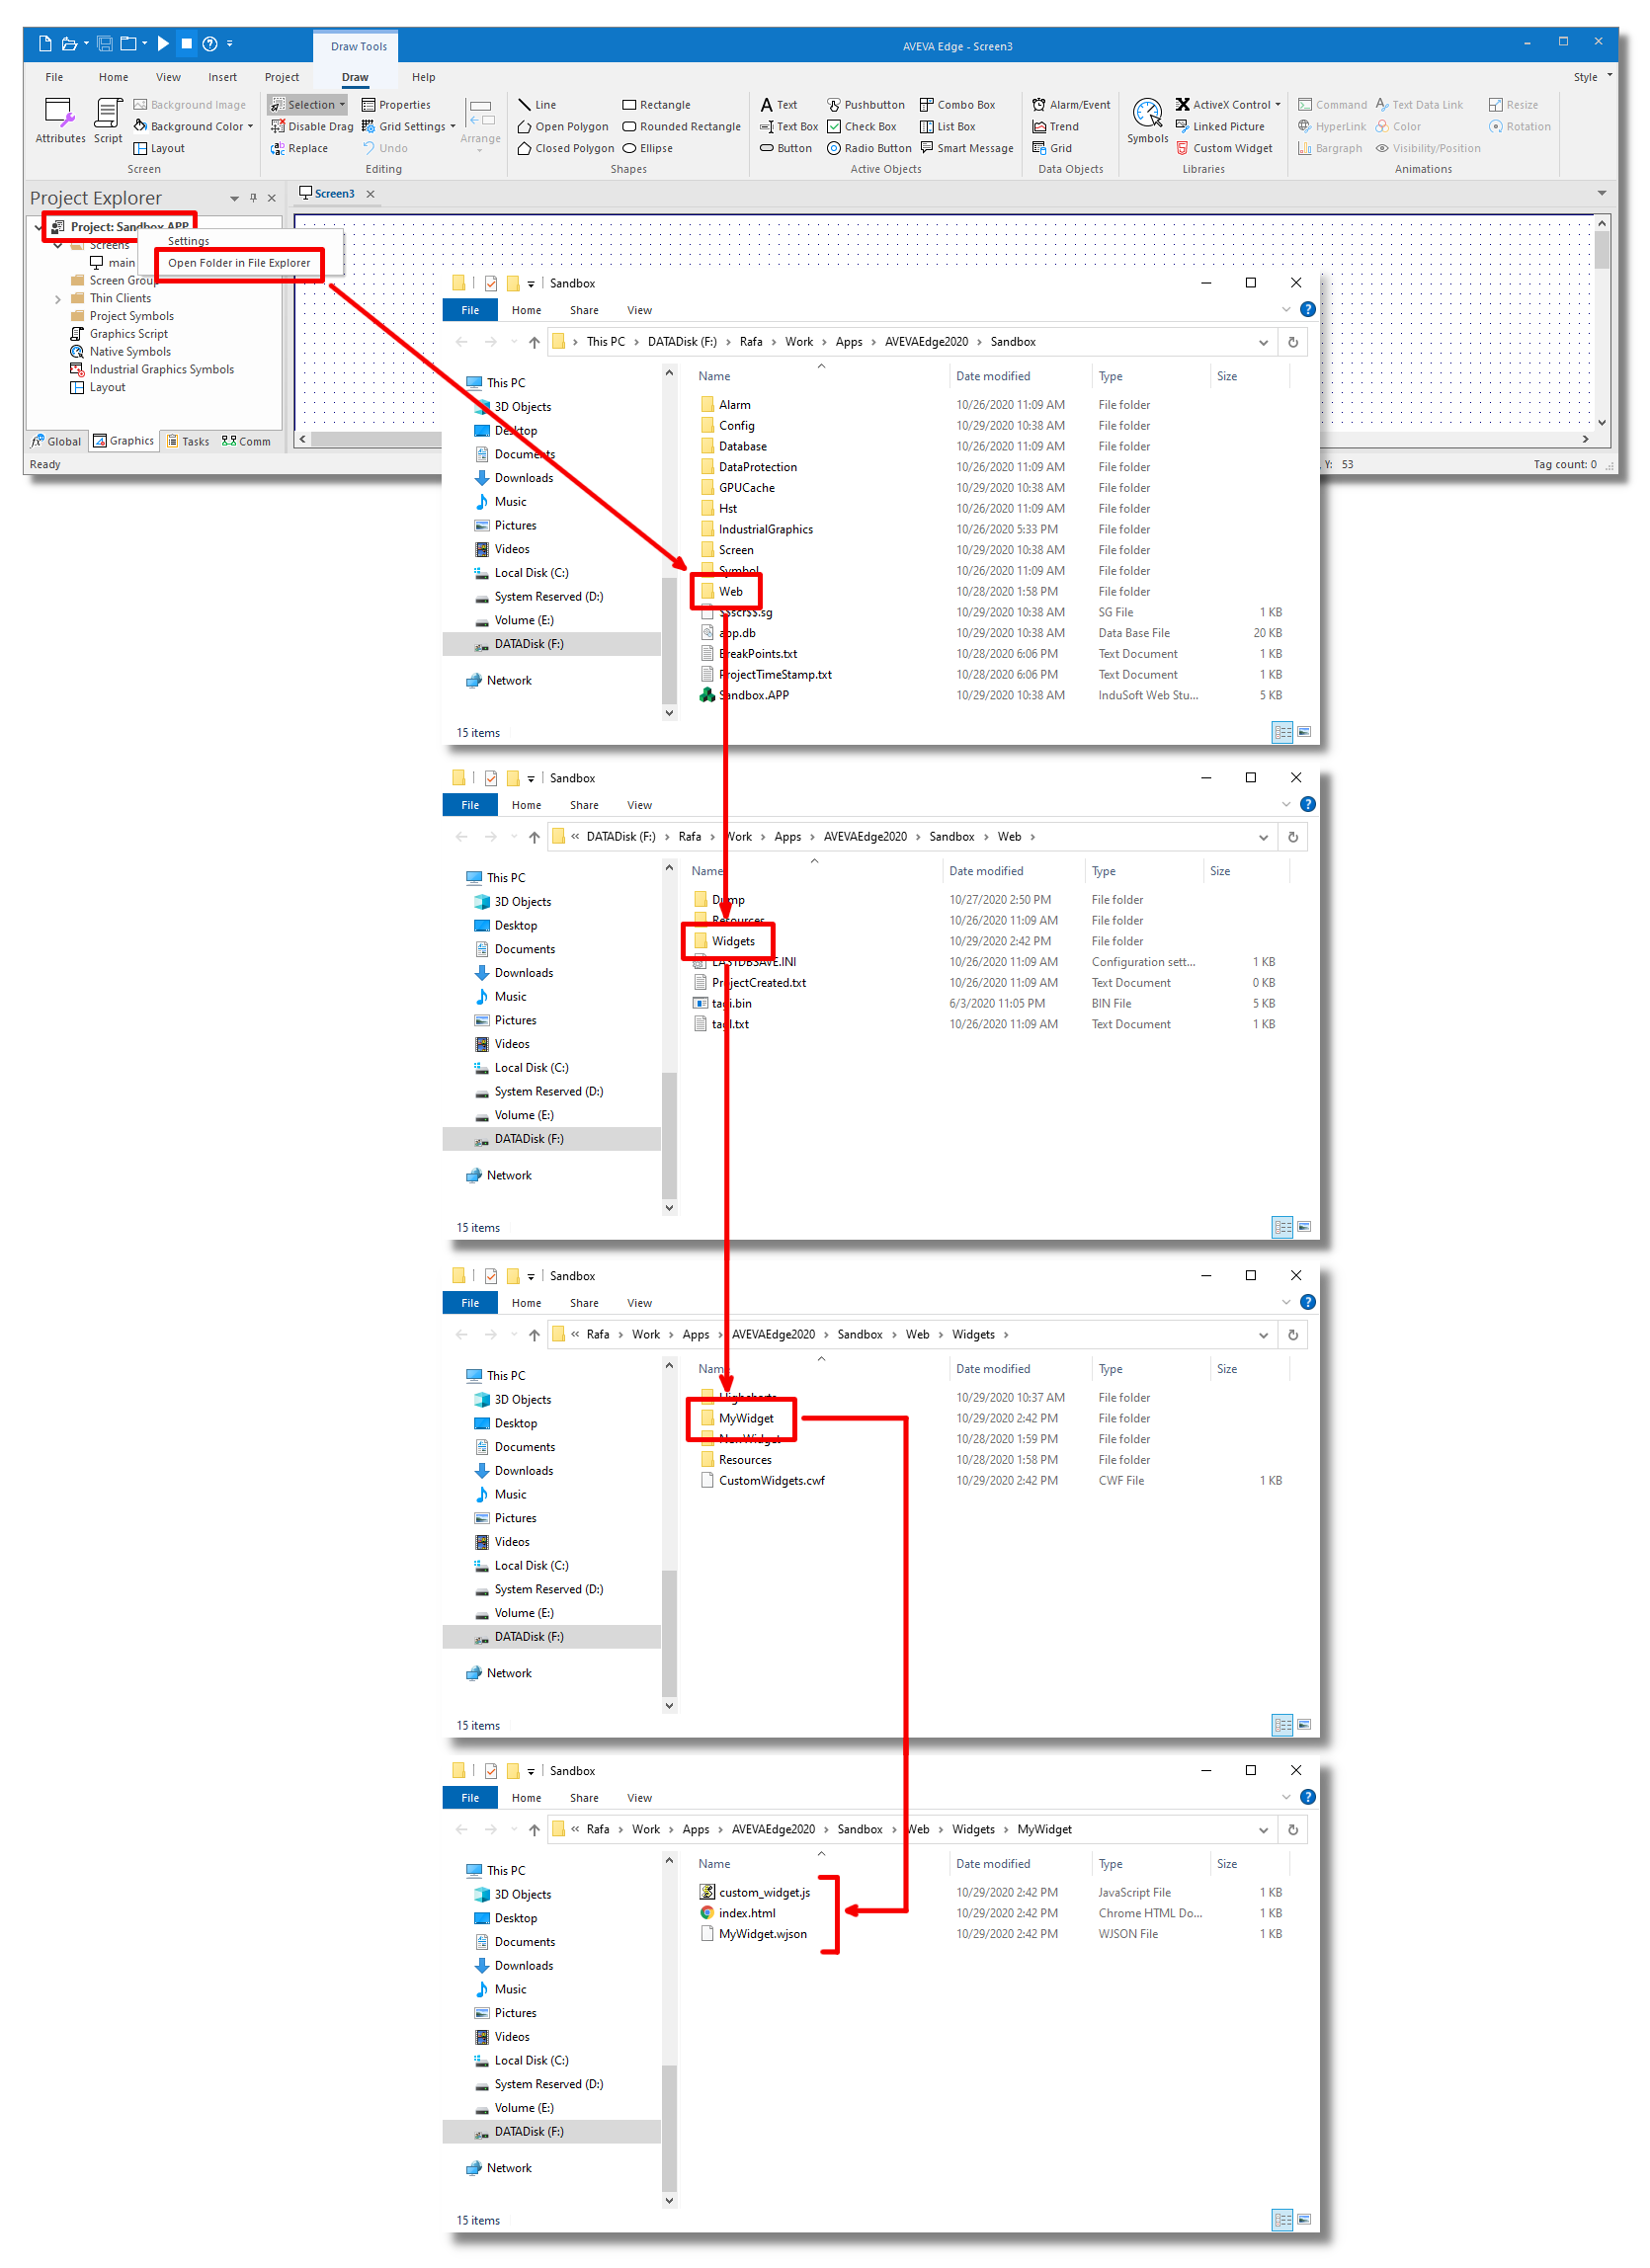
To export the widget, simply zip the widget folder found the <Project Folder>\Web\Widgets and rename the extension from .zip to .cwp. In case components of the widgets are also located in other folders like Resources, it must be included in the zip file as well, respecting the current folder structure.
02. Importing the Custom Widget to InTouch HMI.
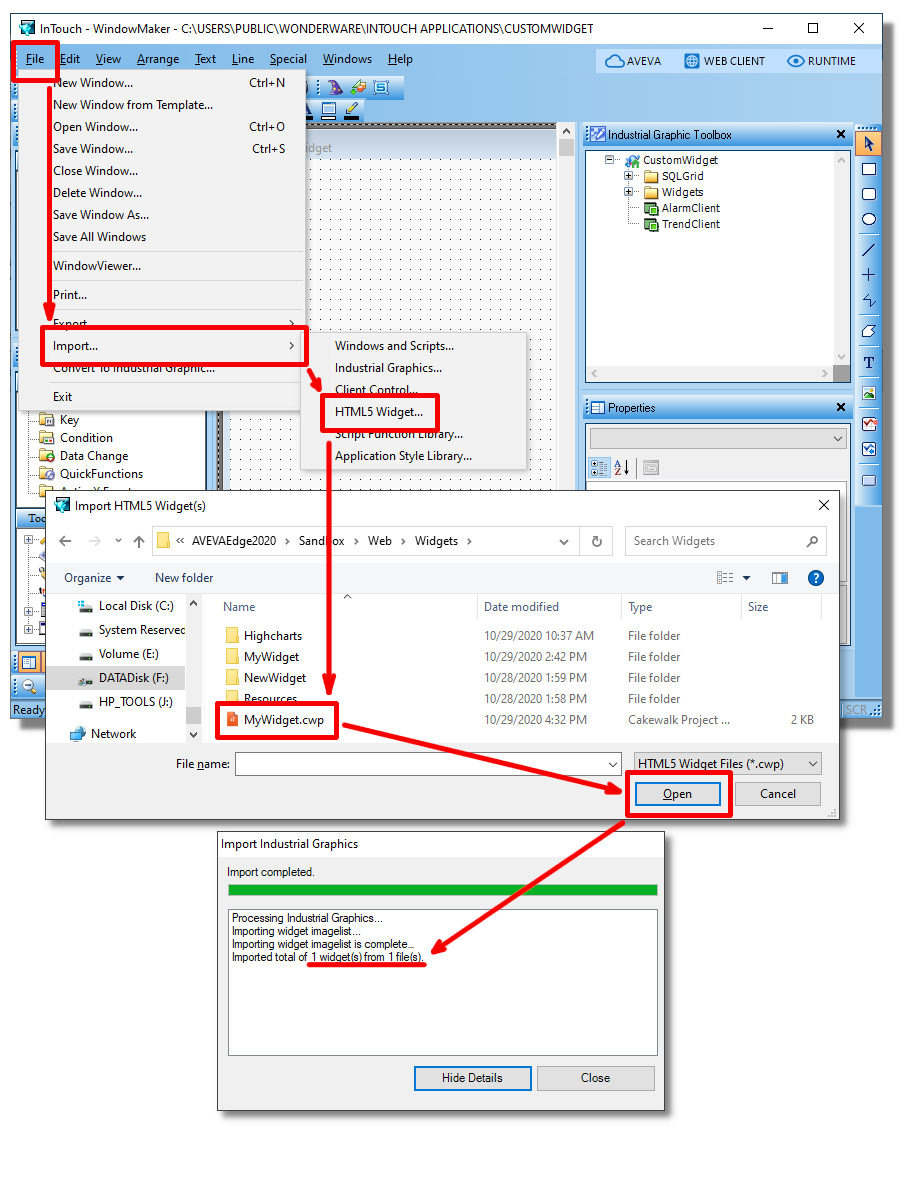
Now that the widget is created and its file extension renamed to .cwp, it's time to import the widget to InTouch HMI. In the InTouch WindowMaker, go to File >> Import... >> HTML5 Widget..., select the .cwp file you just created and press Open. The steps are shown in the picture 04 below.
NOTE
In the current version of InTouch HMI, an error is found when importing the widget and the widget isn't imported to InToch HMI.
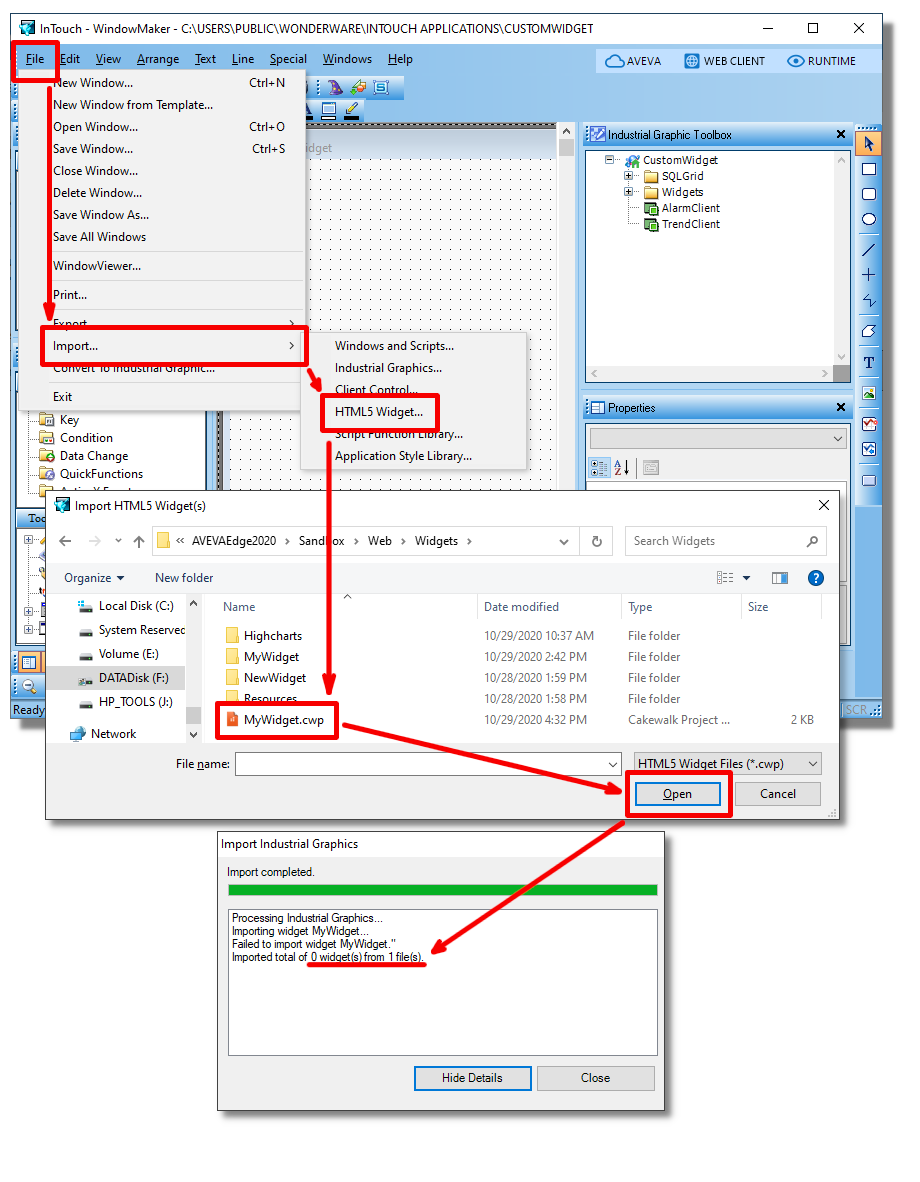
Fig. 04a - Error while importing the widget to InTouch HMI After the import process is finished, the widget isn't listed in the widgets dialog. In order to import your widget, a workaround is required.
Workaround
Instead of importing the widget just created by you, you will have to import one of the native AVEVA Edge's Custom Widget. They are installed automatically together with AVEVA Edge and are located in
C:\Program Files (x86)\AVEVA\AVEVA Edge 2020\Redist\CustomWidgetsLibrary. For your convenience, the respective files are provided in the links below.The imported widget is located in the InTouch application under
<Project Folder>\Widgets. As shown in the picture 4b below, the widget imagelist was successfully imported to the InTouch application.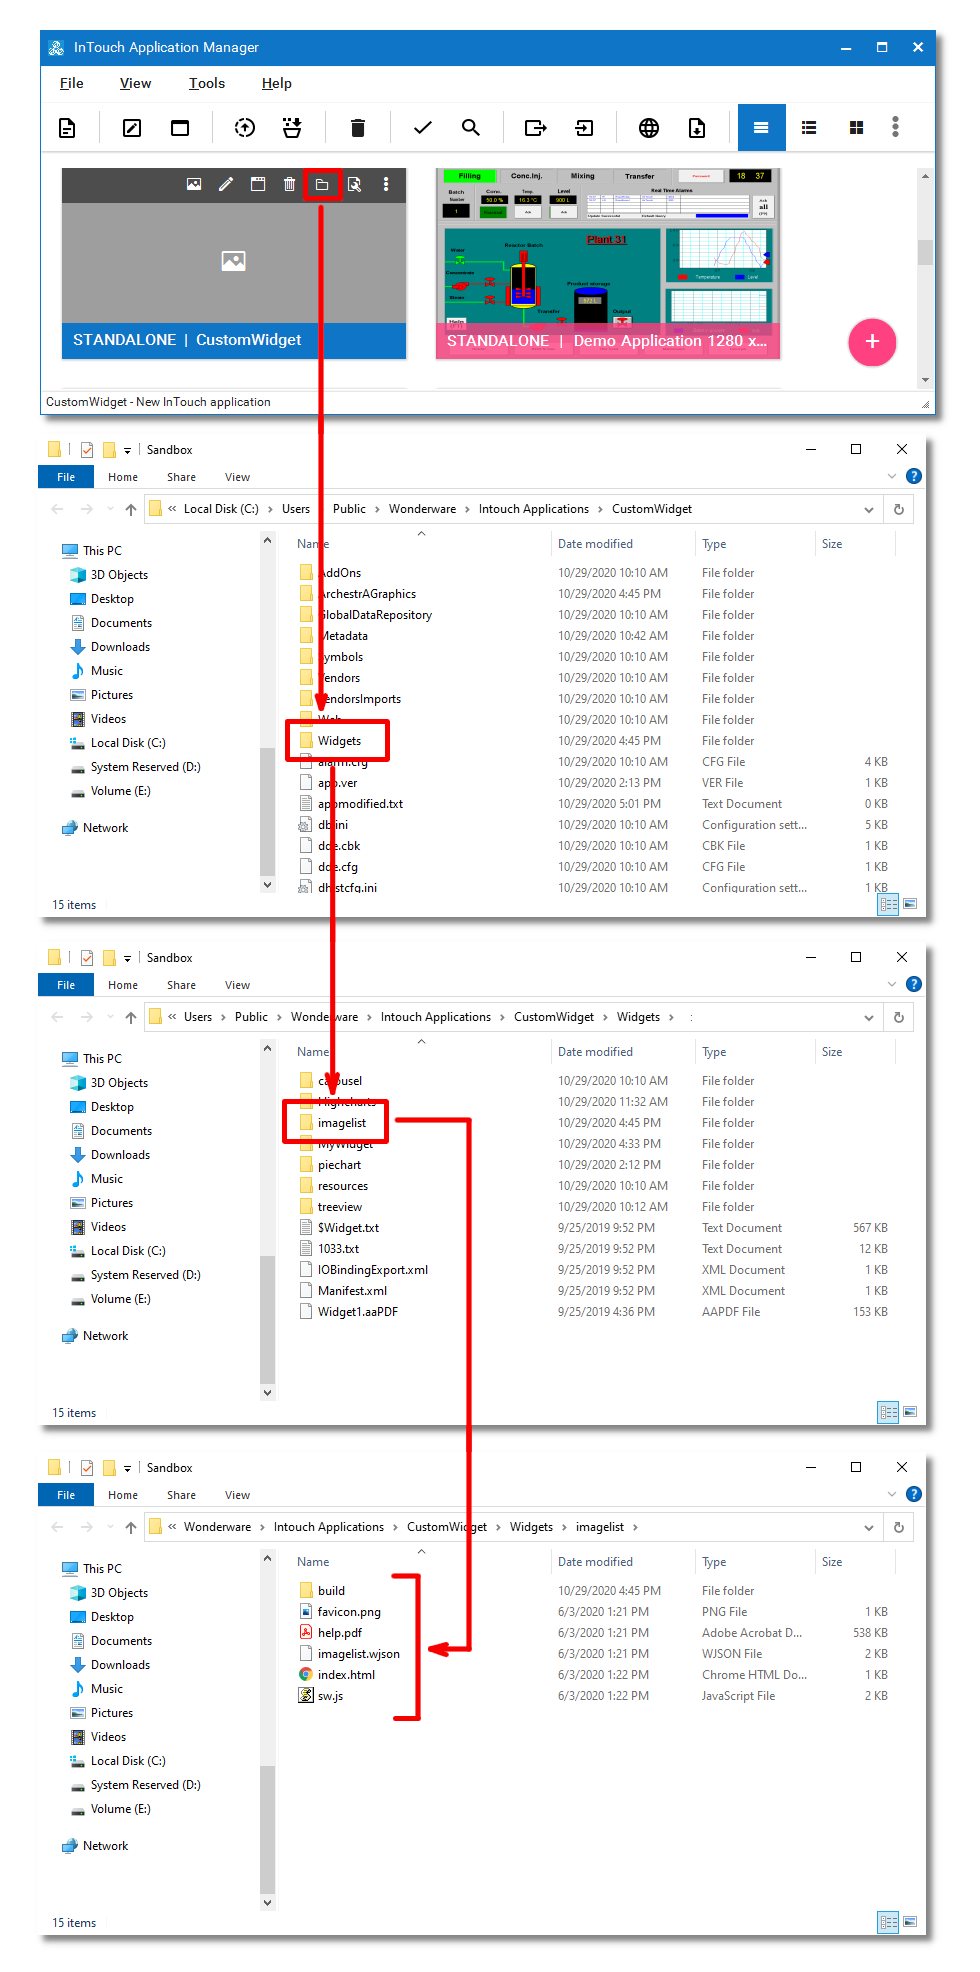
Fig. 04b - Widget path in InTouch application Delete all the content of the widget folder (for example, all items under
<Project Folder>\Widgets\imagelist) and replace it with the content of .cwp file to be imported. The folder structure must be respected here, which means that the .cwp must be unziped inside the widget folder resulting in the index.html file located in<Project Folder>\Widgets\imagelist.This step completes the workaround. The widget will be listed with the original widget name in InTouch WindowMaker.
03. Adding the imported HTML5 Widget to the InTouch application.
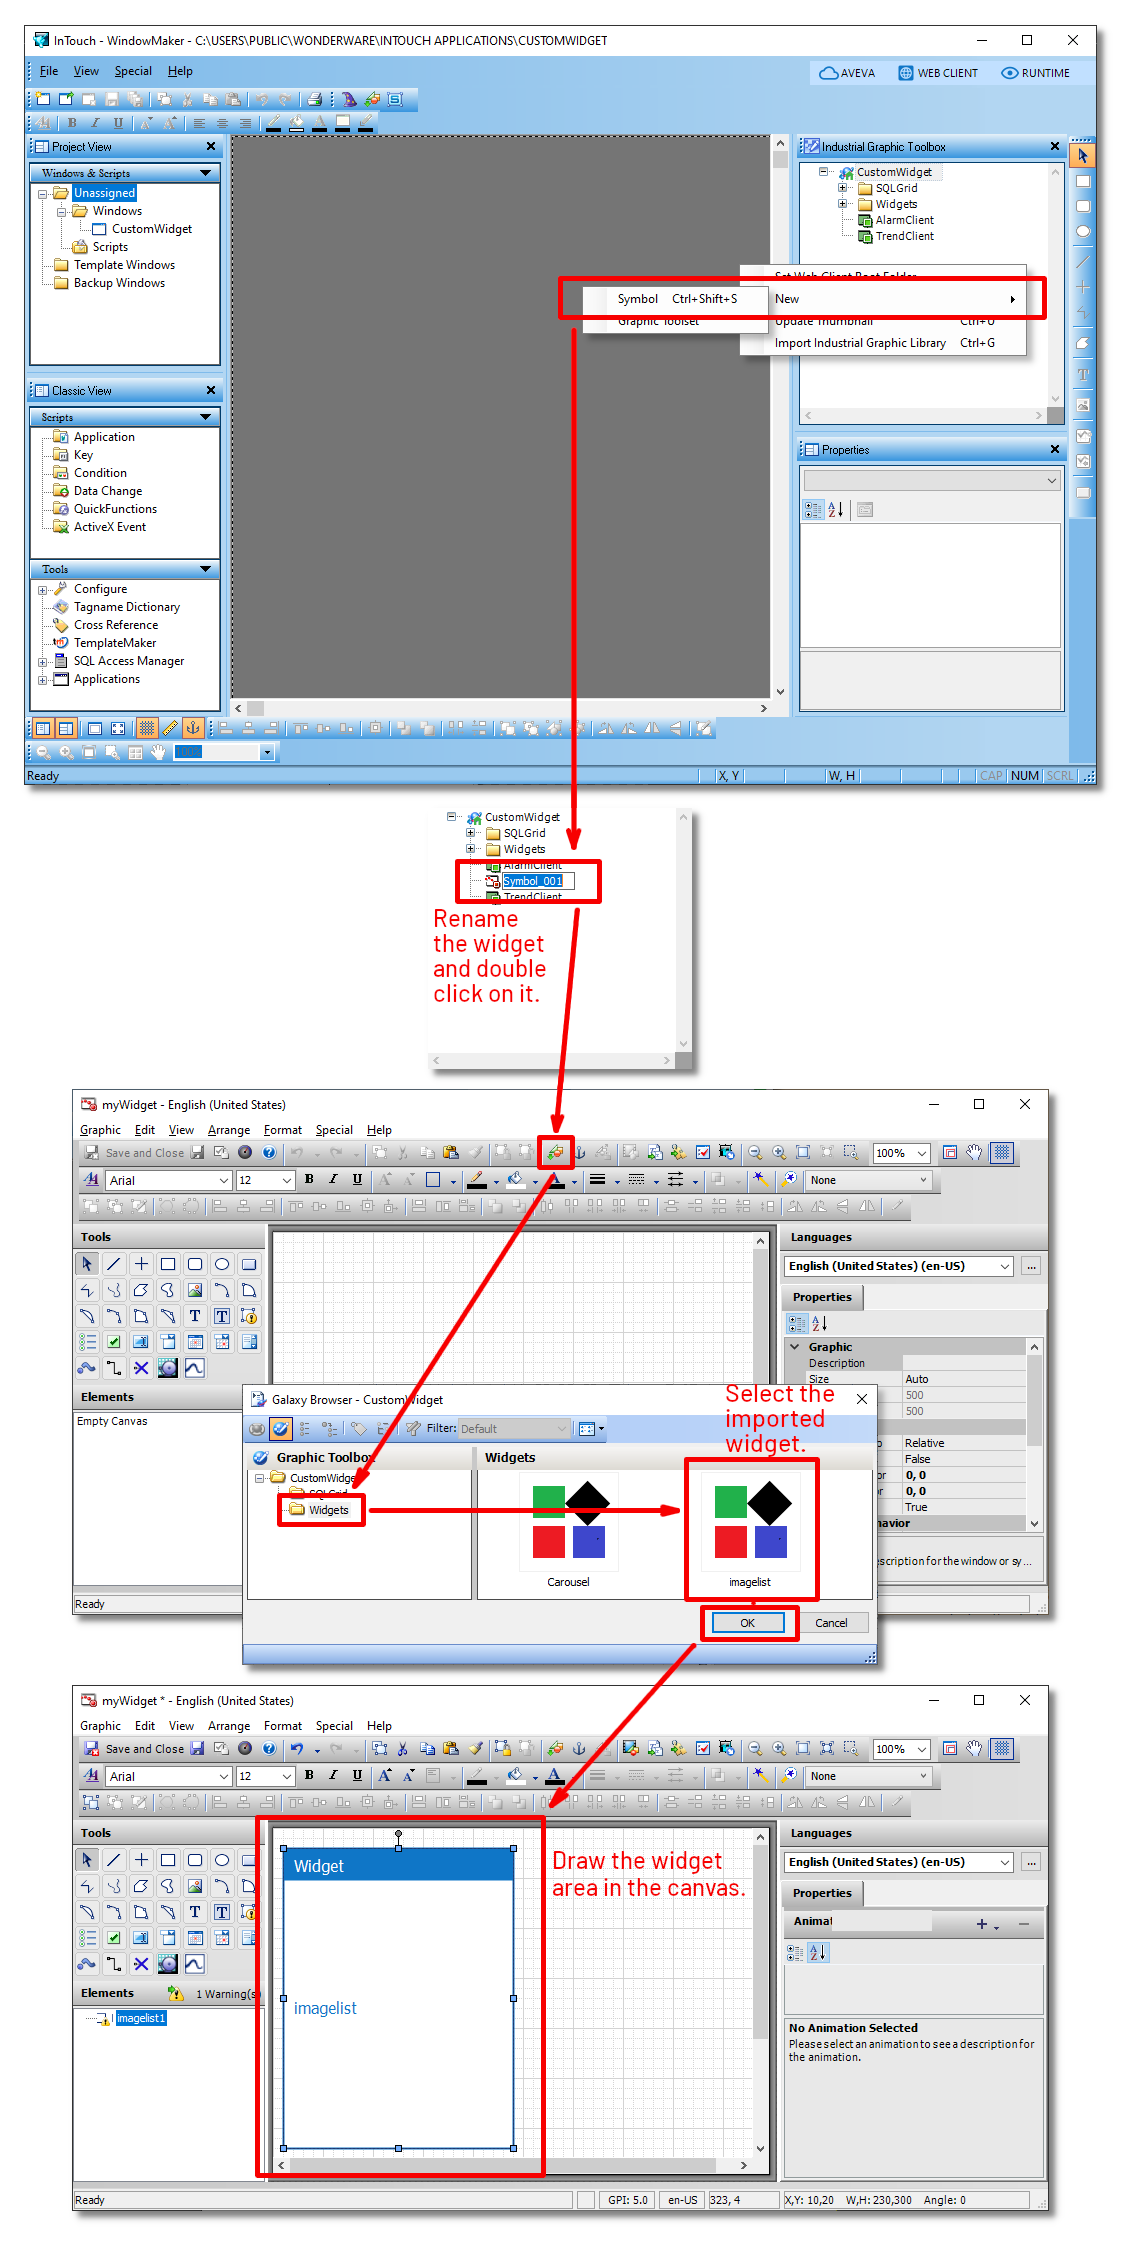
To insert the widget in an InTouch application, create a new Industial Graphics symbol by right-clicking in the Industrial Graphics Toolbox and selecting new. A new item will be displayed in the treeview of Industrial Graphics Toolbox. Give
the new symbol an appropriate name and then double-click on it to open the Industrial Graphics and to edit the respective symbol.
In the Industrial Graphics environment, go to Embed Graphics, select Widgets in the treeview of the
Galaxy Browser and select the imported widget. Draw the area that the widget will be displayed in the symbol and HTML5 widget is added to the symbol. You may now Save and Close the symbol in Industrial Graphics. All the steps are shown
in the picture 05 displayed below.
